이번 시간에는 어떻게 복잡한 관계로 엮인 깊은 신경망(deep nets)를 표현할 수 있는 nerual networks를 생성하는 법에 대해 배우게 됩니다.
"Modularity"가 주요 아이디어입니다.
이는, 더욱 간단한 functional units로부터 comples network를 생성해줍니다.
이전 시간에 linear unit이 어떻게 linear function을 계산하는지 보았습니다.
이제 이러한 single unit을 어떻게 결합하고 수정할 수 있는지 봅시다
Layers
neurons는 layer로, layer가 쌓여 neural network가 됩니다.
공통된 입력값을 사용하는 linear unit을 합치면 dense layer을 얻을 수 있습니다.
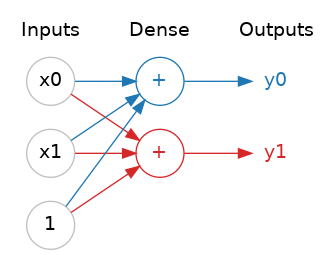
사진 설명:
A dense layer of two linear units receiving two inputs and a bias.
각각의 layer는 상대적으로 간단한 변형(transformation)을 수행합니다.
깊게 쌓인 layers를 지나면서, 입력값을 좀 더 복잡한 방식으로 변형시킵니다.
잘 훈련된 neural network에서는, 각 layer마다 조금 더 해답에 가깝게 해주는 변형 방식을 가지고 있습니다.
+) Many kinds of layers
Keras 속 하나의 "layer"에는 다양한 종류가 있습니다.
convolutional and recurrent layers와 같은 많은 layers는 neurons을 거치며 data를 변형시키고, 초기의 연결 패턴과 달라집니다.
그저 feature engineering or just simple arithmetic 를 사용하는 사람들도 있습니다.
The Activaiton Function
두 개의 dense layer 사이에 아무것도 넣지 없더라도 single dense layer를 사용할 때보다 효율이 떨어지기도 합니다.
Dense Layers는 절대로 선과 평면의 세계에서 탈출할 수 없습니다.
이 때 curves에 맞추기 위해선 non-linear한 무언가, 바로 Activation function이 필요합니다.
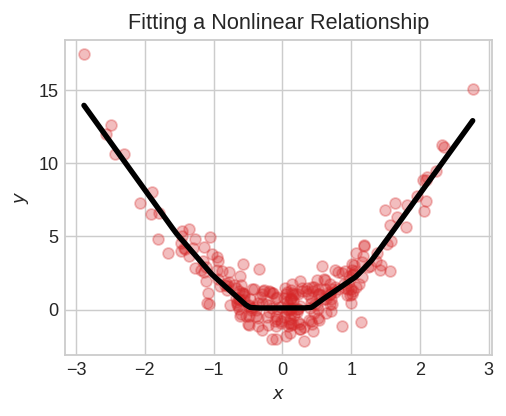
activiation function이 없다면, neural network는 오직 linear한 relationship만 학습하게 됩니다.
Activation function은 각 layer의 출력값에 적용하는 간단한 함수입니다. 가장 유명한 건 max(0,x) - recetifier function입니다. ReLU function이라고도 많이 부르죠.
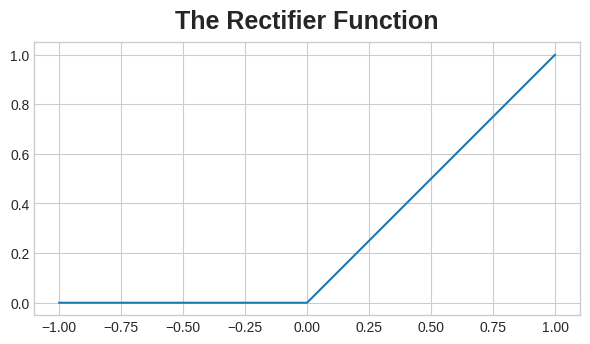
rectifier function은 입력값이 음수인 경우를 제외시켜주는 하나의 그래프를 가지고 있습니다.
이를 통해 직선들이 아닌 data의 출력값이 구부러지게 합니다.
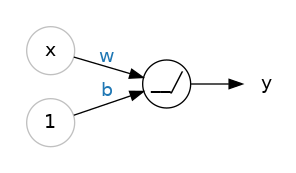
rectifier을 linear unit에 적용하고 싶다면,
'rectified linear unit' 또는 'ReLU'를 씁니다.
Stacking Dense Layers _ nonlinearlity
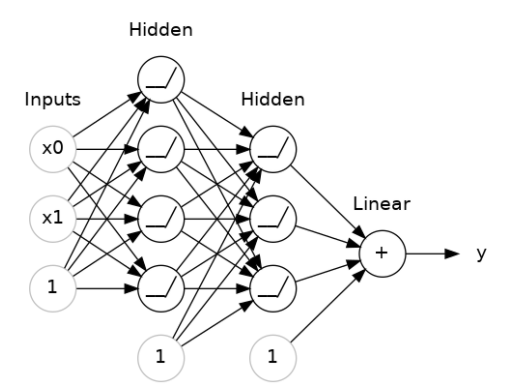
최종 출력 이전에 각 layer마다 나오는 결과치를 'hidden'이라고 부릅니다.
력값에서 그 값을 그대로 볼 수 없기에 hidden이라고 부르죠.
최종 출력 layer는 하나의 linear unit으로 되어있습니다. 즉, activation function이 그곳에는 적용되지 않았죠.
이는 임의의 숫자 값을 예측하는 regression task에 적합한 network를 생성해줍니다.
이외의 tasks (like classification)은 output에도 activation function이 필요할 겁니다.
Building Sequential Models
'Sequential' model은 첫 layer부터 마지막 layer까지 모두 연결시키기 위해 사용했습니다.
first layer는 입력값을 받아주고, last layer을 output을 출력하죠.
from tensorflow import keras
from tensorflow.keras import layers

model = keras.Sequential([
    # the hidden ReLU layers
    layers.Dense(units=4, activation='relu', input_shape=[2]),
    layers.Dense(units=3, activation='relu'),
    # the linear output layer
    layers.Dense(units=1),
])
모든 layer를 하나하나 입력받는 대신 하나의 리스트에 넣어주면(like [layer, layer, layer, ...] ) 됩니다.
layer에 activation function을 적용하고 싶다면, 그저 'activiation' 입력인자에 그 함수의 이름을 적어주면 됩니다.
Exercise
Setup
Concrete dataset를 통해 다양한 제조법에 따라 생산된 콘크리트의 압축 강도를 측정하려 합니다.
import tensorflow as tf

# Setup plotting
import matplotlib.pyplot as plt

plt.style.use('seaborn-whitegrid')
# Set Matplotlib defaults
plt.rc('figure', autolayout=True)
plt.rc('axes', labelweight='bold', labelsize='large',
       titleweight='bold', titlesize=18, titlepad=10)


import pandas as pd

concrete = pd.read_csv('../input/dl-course-data/concrete.csv')
concrete.head()

concrete.shape
1st) input shape
'CompressiveStrength' column을 target으로, 그 외의 모든 columns를 input으로 할 때의 input shape는?
input_shape = [concrete.shape[1]-1]
2nd) Define a Model with Hidden Layers
3개의 hidden layers를 가진 model를 생성해봅시다
각 layer마다 ReLU activation이 적용된 512개의 unit이 있습니다.
출력 layer는 unit도 한 개, activiation은 사용하지 않는다는 점 명심하세요.
그리고, input_shape는 first layer을 위한 argument라는 점도 명심하세요.
from tensorflow import keras
from tensorflow.keras import layers

model = keras.Sequential([
    layers.Dense(units=512,activation='relu', input_shape=[8]),
    layers.Dense(units=512,activation='relu'),
    layers.Dense(units=512,activation='relu'),
    layers.Dense(units=1)
])
3rd) Activation Layers
activation function에 대해 좀 더 알아봅시다.
Dense layer에 activation function을 적용하는 가장 흔한 방법은 그 함수 이름을 'activation' argument에 쓰는 것입니다.
그 activation function과 Dense layer 사이에 또다른 layer를 끼워넣고 싶다면, (튜토리얼 5 - batch normalization) 오로지 activaiton을 위한 'Activation' layer를 정의할 수 있습니다.
아래의 코드블록은 layers.Dense(units=8, activation='relu')와 동일합니다
model = keras.Sequential([
    layers.Dense(32, input_shape=[8]),
    layers.Activation('relu'),
    layers.Dense(32),
    layers.Activation('relu'),
    layers.Dense(1),
])
+) Alternatives to ReLU
ex) 'elu', 'selu', 'swish'... in Keras
task마다 activation의 성능이 달라지므로, 여러 activation을 실험해보며 모델을 발전시키는 게 좋음
- ReLU
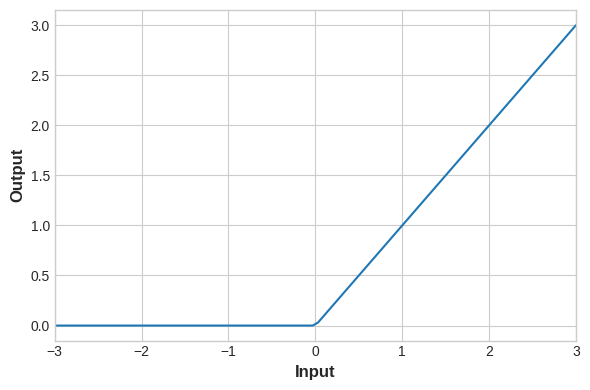
# YOUR CODE HERE: Change 'relu' to 'elu', 'selu', 'swish'... or something else
activation_layer = layers.Activation('relu')

x = tf.linspace(-3.0, 3.0, 100)
y = activation_layer(x) # once created, a layer is callable just like a function

plt.figure(dpi=100)
plt.plot(x, y)
plt.xlim(-3, 3)
plt.xlabel("Input")
plt.ylabel("Output")
plt.show()
- elu
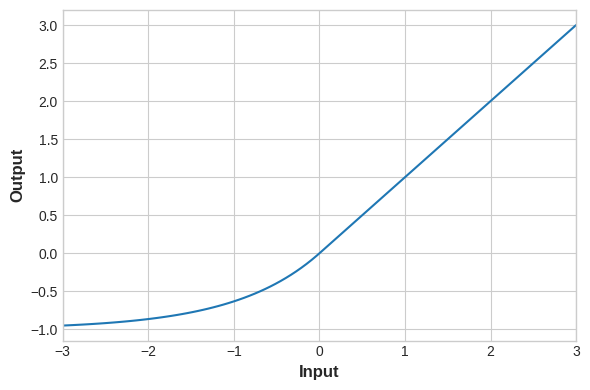
# YOUR CODE HERE: Change 'relu' to 'elu', 'selu', 'swish'... or something else
activation_layer = layers.Activation('elu')

x = tf.linspace(-3.0, 3.0, 100)
y = activation_layer(x) # once created, a layer is callable just like a function

plt.figure(dpi=100)
plt.plot(x, y)
plt.xlim(-3, 3)
plt.xlabel("Input")
plt.ylabel("Output")
plt.show()
- selu
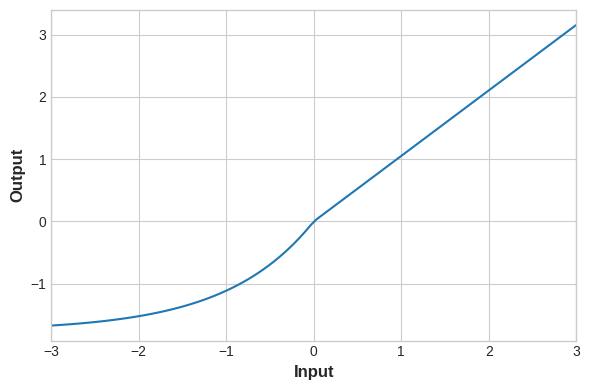
activation_layer = layers.Activation('selu')

x = tf.linspace(-3.0, 3.0, 100)
y = activation_layer(x) # once created, a layer is callable just like a function

plt.figure(dpi=100)
plt.plot(x, y)
plt.xlim(-3, 3)
plt.xlabel("Input")
plt.ylabel("Output")
plt.show()
- swish
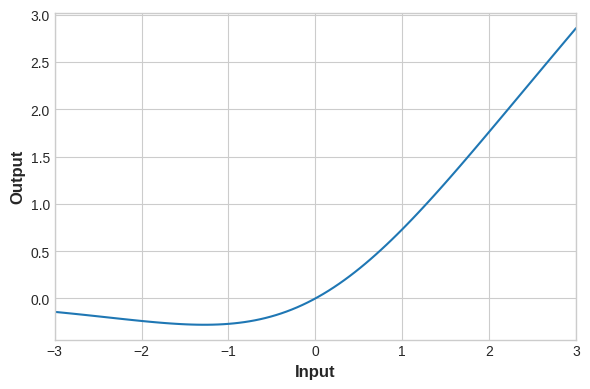
activation_layer = layers.Activation('swish')

x = tf.linspace(-3.0, 3.0, 100)
y = activation_layer(x) # once created, a layer is callable just like a function

plt.figure(dpi=100)
plt.plot(x, y)
plt.xlim(-3, 3)
plt.xlabel("Input")
plt.ylabel("Output")
plt.show()'Machine Learning > [Kaggle Course] ML (+ 딥러닝, 컴퓨터비전)' 카테고리의 다른 글
| [Kaggle Course] Overfitting, Underfitting → early_stopping + capacity↑ (0) | 2020.12.24 |
|---|---|
| [Kaggle Course] Stochastic Gradient Descent (0) | 2020.12.22 |
| [Kaggle Course] A Single Neuron _ Define a linear model (0) | 2020.12.17 |
| [Kaggle Course] How to prevent "Data Leakage" (0) | 2020.11.01 |
| [Kaggle Course] XGBoost (gradient boosting) + Ensemble method (0) | 2020.10.24 |