You may have to understand
state-machines,
timing characteristics,
as well as the initialization code and memory map
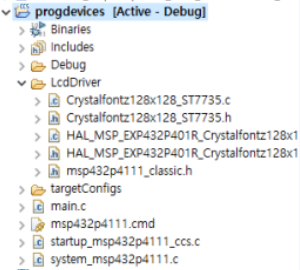
LCD
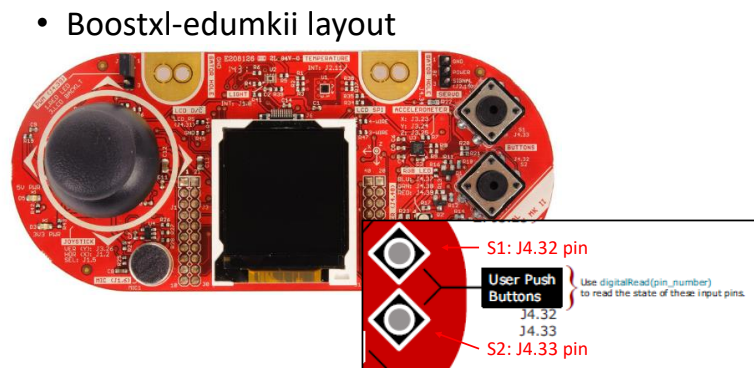
in "MSP-EXP432P4111 boostxl-edumk-ii extension board"
- 128x128 pixels
- 24bit color data for each pixel
+) 추가적인 custom-built sample code
- Grlib (Graphic Library)
- LCD Driver (LCD device driver)
- Additional configurations
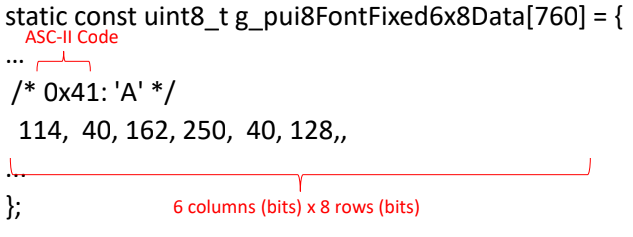
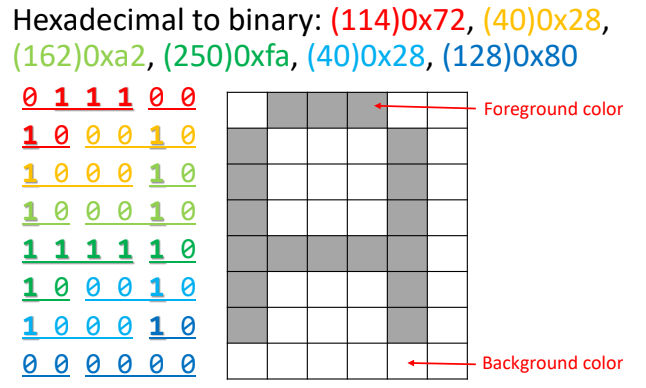
Bitmap Font Internals
char 용 bitmap을 가져와 API에 넣어서 화면에 출력
ex) 'A' 출력하기
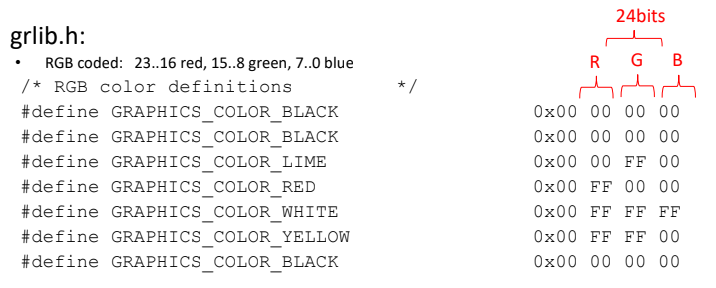
Color Data - grlib.h
graphic library
LCD 설정하기
<LCD 화면 방향> : SetOritentation
//main():
/* Set default screen orientation */
Crystalfontz128x128_SetOrientation(LCD_ORIENTATION_UP);
#define LCD_ORIENTATION_UP 0
#define LCD_ORIENTATION_LEFT 1
#define LCD_ORIENTATION_DOWN 2
#define LCD_ORIENTATION_RIGHT 3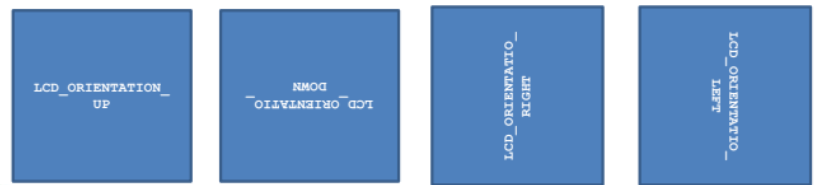
<Font 설정> : 글꼴, 배경색, 글자색
색깔 예시 : GRAPHICS_COLOR_RED, GRAPHICS_COLOR_WHITE, GRAPHICS_COLOR_BLACK
// void GrContextFontSet(Graphics_Context *context, const Graphics_Font *font);
GrContextFontSet(&g_sContext, &g_sFontFixed6x8);
// g_sFontFixed6x8: Fixed sized (default 6 columns 8 rows) font in pp. 5-6

// void Graphics_setBackgroundColor(Graphics_Context *context, int32_t value);
Graphics_setBackgroundColor(&g_sContext, GRAPHICS_COLOR_RED);

// void Graphics_setForegroundColor(Graphics_Context *context, int32_t value);
Graphics_setForegroundColor(&g_sContext, GRAPHICS_COLOR_WHITE);
//value (e.g. GRAPHICS_COLOR_RED): 24-bit RGB color value or predefined color value in p. 8
<문자 출력하기> : drawString()
Graphics_drawString(&g_sContext,
(int8_t *)"Hello, World!", //casted string pointer
AUTO_STRING_LENGTH, //automatically allocate spaces fit for '*string'
64, //pixel 좌표 (0~128)
30, //pixel 좌표 (0~128)
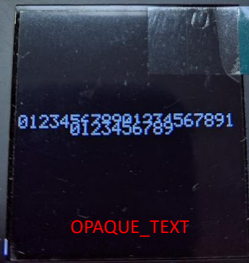
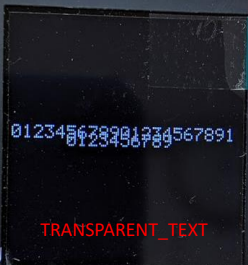
OPAQUE_TEXT // fill by background color <-> TRANSPARENT_TEXT
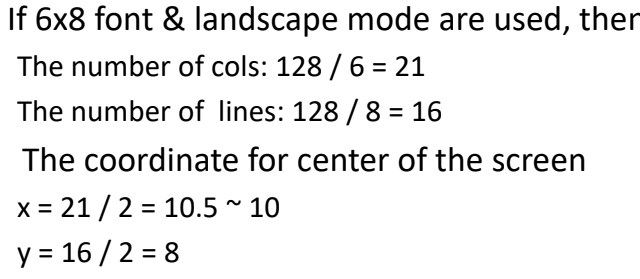
);+) 가로(column) 128 pixel이고 글자 한 칸이 6 pixel을 차지하니
총 21개 글자를 적을 수 있음
+) 세로(row) 128 pixel이고 글자 한 칸이 8 pixel을 차지하니
총 16개 글자를 적을 수 있음
ex) 정중앙에 *을 띄우고 싶다면,
+) 글자를 겹칠까 덮을까
 |
 |
<문자 지우기> : Graphics_clearDisplay(&g_sContext);
background color로 화면을 지움
//void Graphics_clearDisplay(const Graphics_Context *context);
Graphics_clearDisplay(&g_sContext);
Programming Exercise
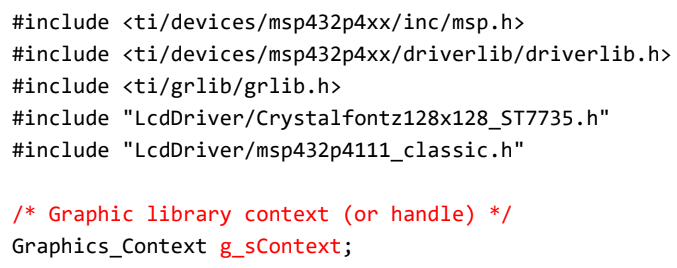
#include <ti/devices/msp432p4xx/inc/msp.h>
#include <ti/devices/msp432p4xx/driverlib/driverlib.h>
#include <ti/grlib/grlib.h>
#include "LcdDriver/Crystalfontz128x128_ST7735.h"
#include "LcdDriver/msp432p4111_classic.h"
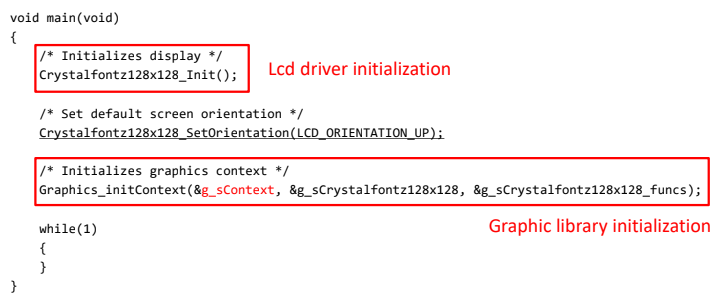
void main(void)
{
/* Graphic library context */
Graphics_Context g_sContext;
/* Initializes display */
Crystalfontz128x128_Init();
/* Set default screen orientation */
Crystalfontz128x128_SetOrientation(LCD_ORIENTATION_UP);
/* Initializes graphics context */
Graphics_initContext(&g_sContext, &g_sCrystalfontz128x128, &g_sCrystalfontz128x128_funcs);
Graphics_setForegroundColor(&g_sContext, GRAPHICS_COLOR_RED);
Graphics_setBackgroundColor(&g_sContext, GRAPHICS_COLOR_WHITE);
GrContextFontSet(&g_sContext, &g_sFontFixed6x8);
Graphics_clearDisplay(&g_sContext);
Graphics_drawString(&g_sContext, (int8_t *)"Hello, World!", AUTO_STRING_LENGTH, 12, 24, OPAQUE_TEXT);
}
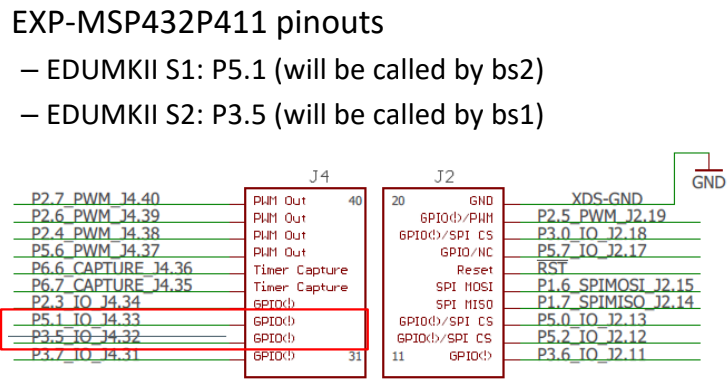
S1 & S2 button
<초기화 코드>
P3->DIR &= ~BIT5;
P5->DIR &= ~BIT1;
P3->REN |= BIT5;
P5->REN |= BIT1;
P3->OUT |= BIT5;
P5->OUT |= BIT1;
<button 확인 코드>
/* Determine if S1 or S2 button in boostxl-edumkii is pressed */
if (!(P5->IN & BIT1))
	// BS1 pressed
else
	// BS1 not pressed
if (!(P3->IN & BIT5))
	// BS2 pressed
else
	// BS2 not pressed
<ex: button으로 화면에서 * 조종하기> - long push 인식 못하는 코드
#define INITIAL -1
#define DOWN 0
#define UP 1
void main(void)
{
  int x=10, y=8;
  int bs1state=INIT;
  ...
  Graphics_drawString(&g_sContext,
  (int8_t *)"*", 1, x*6, y*7,
  OPAQUE_TEXT);

  while(1)
  {
    if (!(P5->IN & BIT1)) {
    	bs1state=DOWN;
    } else if (P5->IN & BIT1) {
      if (bs1state==DOWN) {
        Graphics_drawstring (&g_sContext,
        		(int8_t *)" ",
                        1,
                        x*6,
        		y*7,
                        OPAQUE_TEXT);
        if (y>0) y--;
        Graphics_drawstring(&g_sContext,
        	(int8_t *)"*",
                    1,
                    x*6,
                y*7,
                OPAQUE_TEXT);
        bs1state=UP;
      }
    }
  }
  ...
}
State
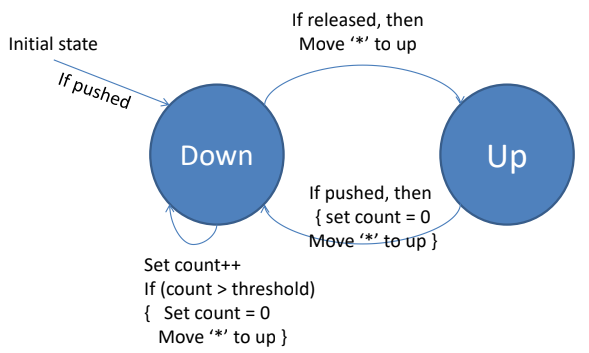
#define INIT -1
#define DOWN 0
#define UP 1
#define TH 100000 // 추가
void main(void)
{
  int x=10, y=8;
  int bs1state=INIT;
  int bs1count=0;  // 추가
  ...
  Graphics_drawString(&g_sContext, (int8_t *)"*",
  1, x*6, y*7, OPAQUE_TEXT);

  while(1)
  {
    if (!(P5->IN & BIT1)) {
    /////////////////////// 추가
        if ((++bs1count) == TH) {
          bs1count=0;
          Graphics_drawString(&g_sContext,
              (int8_t *)" ",
              1,
              x*6,
              y*7,
              OPAQUE_TEXT);

          if (y>0) y--;

          Graphics_drawString(&g_sContext,
              (int8_t *)"*",
              1,
              x*6,
              y*7,
              OPAQUE_TEXT);
        }

    ////////////////////////
    	bs1state=DOWN;
    }
    else if (P5->IN & BIT1) {
      if (bs1state==DOWN) {
          bs1count=0; //추가
          Graphics_drawString(&g_sContext,
              (int8_t *)" ",
              1,
              x*6,
              y*7,
              OPAQUE_TEXT);

          if (y>0) y--;

          Graphics_drawString(&g_sContext,
              (int8_t *)"*",
              1,
              x*6,
              y*7,
              OPAQUE_TEXT);
        }
        bs1state=UP;
      }
    }
  }
}
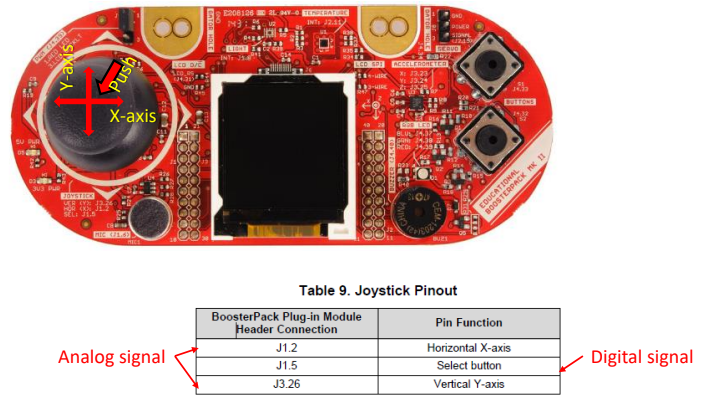
Joystick
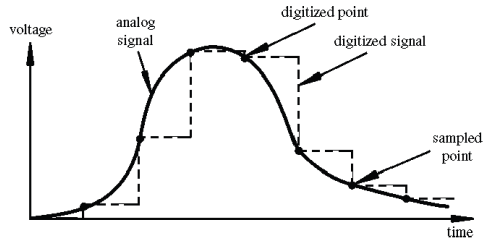
Analog Signal
ADC : Analog-to-digital converters
디지털 컴퓨터는 아날로그 신호를 처리할 수 없고 대신 디지털 신호로 변환
- resolution
- sample rate
정량화 과정 : rounding off
joystick은 potentionmeter와 방식이 유사한데
저항의 길이를 조절하여
전압을 조절함으로써 analog data를 생성

Programming Exercise
Joystick 초기화
/* Configures Pin 6.0 and 4.4 as ADC input */
MAP_GPIO_setAsPeripheralModuleFunctionInputPin(
	GPIO_PORT_P6,
    GPIO_PIN0,
    GPIO_TERTIARY_MODULE_FUNCTION);
MAP_GPIO_setAsPeripheralModuleFunctionInputPin(
	GPIO_PORT_P4,
    GPIO_PIN4,
    GPIO_TERTIARY_MODULE_FUNCTION);

/* Initializing ADC (ADCOSC/64/8) */
MAP_ADC14_enableModule();
MAP_ADC14_initModule(ADC_CLOCKSOURCE_ADCOSC,
	ADC_PREDIVIDER_64,
    ADC_DIVIDER_8,
    0);

/* Configuring ADC Memory (ADC_MEM0 - ADC_MEM1 (A15, A9) with repeat)
* with internal 2.5v reference */
MAP_ADC14_configureMultiSequenceMode(ADC_MEM0, ADC_MEM1, true);
MAP_ADC14_configureConversionMemory(ADC_MEM0,
    ADC_VREFPOS_AVCC_VREFNEG_VSS,
    ADC_INPUT_A15,
    ADC_NONDIFFERENTIAL_INPUTS);
MAP_ADC14_configureConversionMemory(ADC_MEM1,
    ADC_VREFPOS_AVCC_VREFNEG_VSS,
    ADC_INPUT_A9,
    ADC_NONDIFFERENTIAL_INPUTS);

/* Setting up the sample timer to automatically step through the sequence
* convert.
*/
MAP_ADC14_enableSampleTimer(ADC_AUTOMATIC_ITERATION);

/* Triggering the start of the sample */
MAP_ADC14_enableConversion();
MAP_ADC14_toggleConversionTrigger();
Joystick으로 ADC 값 얻기
/* ADC results buffer */
uint16_t resultsBuffer[2];

..

/* Store ADC14 conversion results */
resultsBuffer[0] = ADC14_getResult(ADC_MEM0);
resultsBuffer[1] = ADC14_getResult(ADC_MEM1);
sprintf()
console이 아닌 LCD screen에 출력하려면
그에 맞는 formatting을 거쳐야 함
char mesg[20];
char hello[10] = “hello”;
char world[10] = “world”;
sprintf(mesg, “%s, %s!”, hello, world);
printf(“%s\n”, mesg);
실습
    while (1)
    {
        /* Store ADC14 conversion results */
        resultsBuffer[0] = ADC14_getResult(ADC_MEM0); // x
        resultsBuffer[1] = ADC14_getResult(ADC_MEM1); // y

        if (resultsBuffer[1] < 1000)
            joyStickDir = DOWN;
        else if (resultsBuffer[1] > 15000)
            joyStickDir = UP;
        else if (resultsBuffer[0] > 15000)
            joyStickDir = RIGHT;
        else if (resultsBuffer[0] < 1700)
            joyStickDir = LEFT;
        else
            joyStickDir = NONE;


        /* redraw * if joystick moved */
        if(joyStickDir != NONE){
            Graphics_drawString(&g_sContext, (int8_t *) " ", 1, x * 6, y * 8, OPAQUE_TEXT);
            switch (joyStickDir)
            {
            case DOWN:
                if (y < 16)
                    y++;
                break;

            case UP:
                if (y > 0)
                    y--;
                break;

            case RIGHT:
                if (x < 21)
                    x++;
                break;

            case LEFT:
                if (x > 0)
                    x--;
                break;
            }
            Graphics_drawString(&g_sContext, (int8_t *) "*", 1, x * 6, y * 8, OPAQUE_TEXT);

            for(i = 0; i < 10000; i++);
        }

    }
while (1)
{
char buf[20];
/* Store ADC14 conversion results */
resultsBuffer[0] = ADC14_getResult(ADC_MEM0); // x
resultsBuffer[1] = ADC14_getResult(ADC_MEM1); // y
// assume leftmost axis value: 2000
// topmost: 2000
// rightmost: 14000
// bottommost: 14000
// you may have to adjust the values for your device
if (resultsBuffer[1] < 2000)
cal_adc_y = 2000;
else if (resultsBuffer[1] > 14000)
cal_adc_y = 14000;
else
cal_adc_y=resultsBuffer[1];
if (resultsBuffer[0] < 2000)
cal_adc_x = 2000;
else if (resultsBuffer[0] > 14000)
cal_adc_x = 14000;
else
cal_adc_x=resultsBuffer[0];
Graphics_drawString(&g_sContext, (int8_t *) " ", 1, x * 6, y * 8, OPAQUE_TEXT);
x = (cal_adc_x-2000) / 571;
y = 16-(cal_adc_y-2000) / 750;
Graphics_drawString(&g_sContext, (int8_t *) "*", 1, x * 6, y * 8, OPAQUE_TEXT);
for(i = 0; i < 10000; i++);
}'CS > Embedded System' 카테고리의 다른 글
| FreeRTOS - Task Management (0) | 2021.12.08 |
|---|---|
| Real-Time Operating Systems - Semaphore (0) | 2021.12.07 |
| [실습] Interrupt & SysTick timer (0) | 2021.12.07 |
| SW Architecture - RR, Interupt, func-queue scheduling, RTOS (0) | 2021.12.07 |
| [실습] User Button Initialization & State Machine (0) | 2021.10.13 |